
I started making enchiladas at home years ago, mostly because I could never find a restaurant version that hit all the spots I craved—bold, cheesy, a little smoky, comforting, and messy in the best way. The first time I made these Cheesy Ground Beef Enchiladas, it was a casual dinner experiment that accidentally turned into a family favorite. Nothing fancy, just good ingredients, a good pan, and zero fear of using extra cheese and sauce. Now it’s become one of those recipes I make when someone asks for “the good one.”
I’ve learned that enchiladas aren’t just about rolling tortillas and baking them. The real magic is in the details—seasoning the beef just right, softening the tortillas so they never crack, using a sauce that sticks like a flavor hug, and layering cheese like you mean it. This recipe is the result of all those small tweaks that turned a simple dish into something unforgettable. It’s my go-to when I want pure comfort disguised as dinner.
What You Need To Make This Recipe
Ground beef:
Ground Beef: The backbone of the filling. I like using 80/20 beef because it stays juicy and flavorful, but not too greasy once it’s drained properly. It absorbs spices beautifully and gives the enchiladas the hearty bite that makes each roll satisfying. The beef should be browned until slightly crisp at the edges for deeper flavor.
Cheese blend:
Cheese Blend: A good melting cheese blend is everything here. Cheddar adds richness, Monterey Jack brings creaminess, and mozzarella holds the stretch factor we love. When mixed together, they melt smoothly without splitting or getting oily. Fresh-shredded melts better than pre-bagged, so I always take those extra 2 minutes to shred it myself.
Enchilada sauce:
Enchilada Sauce: The sauce sets the tone. Choose one with a balanced chili flavor, mild acidity, and smoky notes. You want a sauce that thickens slightly during baking so it clings to the tortillas instead of pooling underneath. If it tastes good straight from the can or jar, you already picked the right one.
Tortillas (flour or corn):
Tortillas: Both work great. Corn tortillas are traditional and slightly earthy, while flour tortillas are softer and easier to roll. If using corn, warming them before rolling is non-negotiable—this prevents cracking and helps them soak sauce without breaking.
Aromatics & spices:
Spices & Aromatics (onion, garlic, cumin, chili, paprika, salt): These are the seasoning heroes. Onion and garlic give the scent foundation, cumin adds warmth, chili powder fuels the enchilada soul, paprika offers color and sweetness, and salt ties it all together. This mix turns basic beef into a bold enchilada-ready filling.
Extras (optional but recommended):
Green chiles or jalapeños: These add mild heat and tangy, bright pops in the filling. They’re subtle once baked but make a massive difference in overall depth.
Ingredients List
- 1 lb (450g) ground beef (80/20)
- 1 small onion, finely diced
- 2 garlic cloves, minced
- 1 tsp cumin
- 2 tsp chili powder
- 1 tsp smoked paprika
- ½ tsp salt (adjust to taste)
- 2 ½ cups cheese blend (cheddar, Monterey Jack, mozzarella), freshly shredded
- 10–12 tortillas (flour or corn)
- 2 cups enchilada sauce (store-bought)
- ½ cup green chiles (optional)
How to Make Cheesy Ground Beef Enchiladas
### Step 1: Brown the beef
I heat a skillet over medium-high and cook the ground beef until it’s no longer pink. I break it up with a spatula and let the edges get slightly brown and crisp. After that, I drain excess grease to avoid soggy enchiladas.
### Step 2: Add aromatics
To the beef, I add the diced onion and garlic. I cook until the onion becomes translucent and fragrant, stirring often so the garlic doesn’t burn. This step builds flavor before the spices go in.
### Step 3: Season the filling
I sprinkle in cumin, chili powder, smoked paprika, and salt. I mix and cook 1–2 minutes until the spices bloom. If adding green chiles, I fold them in at the end. The filling should smell bold and irresistible.
### Step 4: Prep the tortillas
I warm the tortillas—flour in the microwave wrapped in a damp paper towel for 30 seconds, corn on a hot pan for 10 seconds per side. The goal is soft, flexible tortillas that roll without tearing.
### Step 5: Fill, roll, and place
I spoon about 3 tbsp of beef filling into each tortilla, add a pinch of cheese inside, roll tightly, and place seam-side down in a baking dish with a little sauce spread on the bottom first.
### Step 6: Sauce and cheese blanket
I pour enchilada sauce evenly on top, making sure all edges are covered. Then I layer the rest of the cheese on top generously. No skimping—this is where the “cheesy” kicks in.
### Step 7: Bake to bubbly perfection
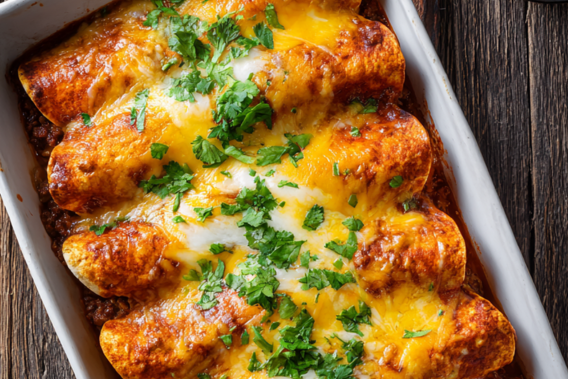
I bake at 375°F (190°C) for 18–22 minutes until the sauce bubbles and the cheese is fully melted and golden in spots. Once out, I let them rest 5 minutes to set before serving.
Tips for Making This Recipe
- Drain the beef well so the filling stays thick and not watery.
- Always warm tortillas before rolling—especially corn.
- Use freshly shredded cheese for smoother melting.
- Coat the tortillas completely with sauce so edges don’t dry.
- Let enchiladas rest after baking to avoid messy slides.
- Add cheese inside the rolls for cheesy bites in every layer.
- If the sauce feels thin, simmer 5 minutes to thicken before pouring.
FAQs
Can I make this ahead of time?
Yes, assemble and refrigerate up to 24 hours before baking. Just add 5 extra minutes baking time if chilled.
Should I use corn or flour tortillas?
It depends. Corn is authentic, flour is easier to roll and softer. Both taste amazing in this recipe.
Can I freeze these enchiladas?
Absolutely. Wrap the dish tightly before baking and freeze up to 3 months. Thaw overnight and bake as normal.
How do I prevent soggy enchiladas?
Drain the beef, thicken the sauce if needed, and avoid overfilling. Also bake uncovered so steam can escape.
What toppings go well with this dish?
Chopped cilantro, sour cream, sliced green onions, avocado, or a squeeze of lime elevate the flavors nicely.